As you know, a bootable USB drive comes handy in many situations such as re-installing Windows operating system or recovering from critical errors (like refreshing your PC, etc). There are several free tools available such as A Bootable USB, Rufus , Novicorp etc. to create bootable USB drive to install Windows as mentioned in following article:
But did you know you can create bootable USB drives of Windows setup without using any extra software? Yes, you heard it right. By following a few simple steps, you can make your own bootable USB drive to install Windows OS without any 3rd party software.
This manual method requires only 3 steps:
So without any further delay let's start the tutorial:
Now format the USB drive using FAT32 or NTFS file system. We recommend formatting the USB drive using NTFS file system for better compatibility with newer Windows versions.
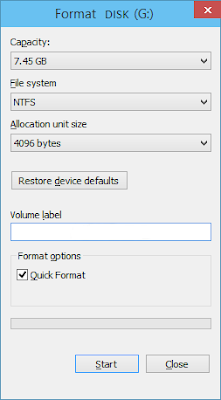
To format USB drive, attach the drive to your computer system, open Windows Explorer, right-click on the USB drive icon and select Format option.

This step is optional. If you don't want to format your USB drive, you can skip this step but make sure there is enough free disk space on your USB drive to copy Windows setup files.
But did you know you can create bootable USB drives of Windows setup without using any extra software? Yes, you heard it right. By following a few simple steps, you can make your own bootable USB drive to install Windows OS without any 3rd party software.
This manual method requires only 3 steps:
- STEP 1: Format USB drive (optional)
- STEP 2: Mount or extract Windows setup ISO file
- STEP 3: Copy Windows setup files to USB drive
So without any further delay let's start the tutorial:
If you want to make Windows Vista or Windows 7 bootable USB drive, a 4GB USB drive will be sufficient. But, if you want to make a bootable drive of Windows 8, Windows 8.1 or Windows 10, you'll need an 8GB USB drive.STEP 1: Prepare USB Drive as Per Requirements
Now format the USB drive using FAT32 or NTFS file system. We recommend formatting the USB drive using NTFS file system for better compatibility with newer Windows versions.
To format USB drive, attach the drive to your computer system, open Windows Explorer, right-click on the USB drive icon and select Format option.

STEP 2: Mount or Extract Windows Setup ISO Image FileNow you'll need to extract all files from Windows setup ISO. You can extract the files using a file archive software such as 7-Zip , WinRAR, etc.
If you are using Windows 8 or later, you don't need to use any file archive utility, you can direct mount the ISO file as a virtual drive in Windows Explorer. You can do this by right-clicking on ISO image file and then selecting "Mount" option.
It will immediately mount the ISO file of Windows setup as a virtual DVD drive in Windows Explorer.
Now you just need to copy all files from extracted or mounted Windows ISO to your USB drive.STEP 3: Copy Windows Setup Files to USB Drive
That's all. You have successfully made a bootable USB drive which can be used for all purposes as mentioned in the beginning of the tutorial.
If you Like my post Than Don't Forget to say THANKS !!


No comments:
Post a Comment